Creating Shapes in Illustrator, Part 1: Rectangle, Ellipse, Rounded Rectangle
Now that we've discussed how to navigate through all the stuff you see when you first open Illustrator, and we've learned about Illustrator's layout, we're ready to start building up those skills. No better place to get going than the Shapes tools.
The shapes tools some of the fundamental building blocks for creating art in Illustrator. These tools are powerful enough on their own, but once you master them, it opens up so much more within Illustrator. Once you learn how to use things like the Pathfinder and Shape Builder tools, it can really expand your capabilities, and you can harness some of the real power of Illustrator. Today, I'll get into all of the different Shape tools except the lonely, forgotten Flare Tool.
On the left hand side of Illustrator, we're looking for this tool:
You might also notice the small white arrow in the corner of that box. Any time you see this, it means there is more to the tool than what is currently visible. To access these additional options, click and hold. The rest of the tools will pop out for you to see, and then simply release your click on the tool you want.
Tip: You can also undock these panels if you prefer to have all of these tools visible to you.
We've got six tools to play with: the Rectangle, Rounded Rectangle, Ellipse, Polygon, Star, and Flare. As I mentioned a second ago, I'm going to talk about the first five.
To create a shape, click the tool that you want, and drag it out onto the canvas. To constrain proportions (meaning a perfect square, circle, star, etc), hold down shift as you drag the items onto your screen.
When you do this using the Rectangle tool, you'll make a perfect square. The same goes for the Rounded Rectangle and Ellipse tool, you'll create a square and circle, respectively. There are a few other options to utilize when creating these shapes. The first is the Alt key. If you hold down the Alt key while you are creating a shape, you'll create the shape from the center point of the object.
Second, if you hold down Shift while you hold down Alt, you'll make a constrained shape from the center point.
A more precise way to create shapes is to select the tool that you want to use, and click once on the canvas. This will bring up a dialog box with all the specific measurements that you can precisely manipulate.
Tip: Using dialog boxes is a great way to learn about the different features you can tweak when using a specific tool. For example, here's what the rectangle and ellipse tool dialog boxes look like:
The only items you can manipulate with Rectangles and Ellipses are width and height.
The options are different with each tool in Illustrator. Test all the different tools out!
Moving on to the Rounded Rectangle, this tool has a few more bells and whistles.
Try dragging out a Rounded Rectangle out onto your artboard, and keep the mouse clicked. While the shape is dragged out, use your arrow keys, and see what happens to the shape of your rounded rectangle. You are able to adjust the corner radius of your shape live, as you're making it. If you press the left and right arrows, the shape toggles between fully rounded and squared corners. The up and down arrow keys allow you to make minute adjustments to your shape to get it exactly as you want it.
Make adjustments on the fly using the arrow keys!
Just like with the Ellipse and Rectangle tools, you can click once on your Artboard with this tool, and it will bring up a similar dialog box, except this one has one additional field, Corner Radius. You can use this to dial in exactly the corner radius you want.
Live Corners
Prior to Illustrator CC, it was somewhat difficult to adjust a single corner radius without some trickery. However, the first iteration of Illustrator CC introduced Live Corners. This means you can adjust each corner independently. I'll show you how.
When you drag out a new rectangle or rounded rectangle in Illustrator CC or above, you might notice these blue circles on the corners. These are Live Corners, and they give you the ability to adjust the radius of your circle on the fly:
In this example, all four corners have been selected. If I click and drag any of the circles (indicated by the yellow arrows), all of these corners will change universally. To change one corner individually, deselect the object, then use the Direct Selection Tool to select one individual corner. You will see the same circle appear by the corner point, and you can drag to move the individual corner to how you desire.
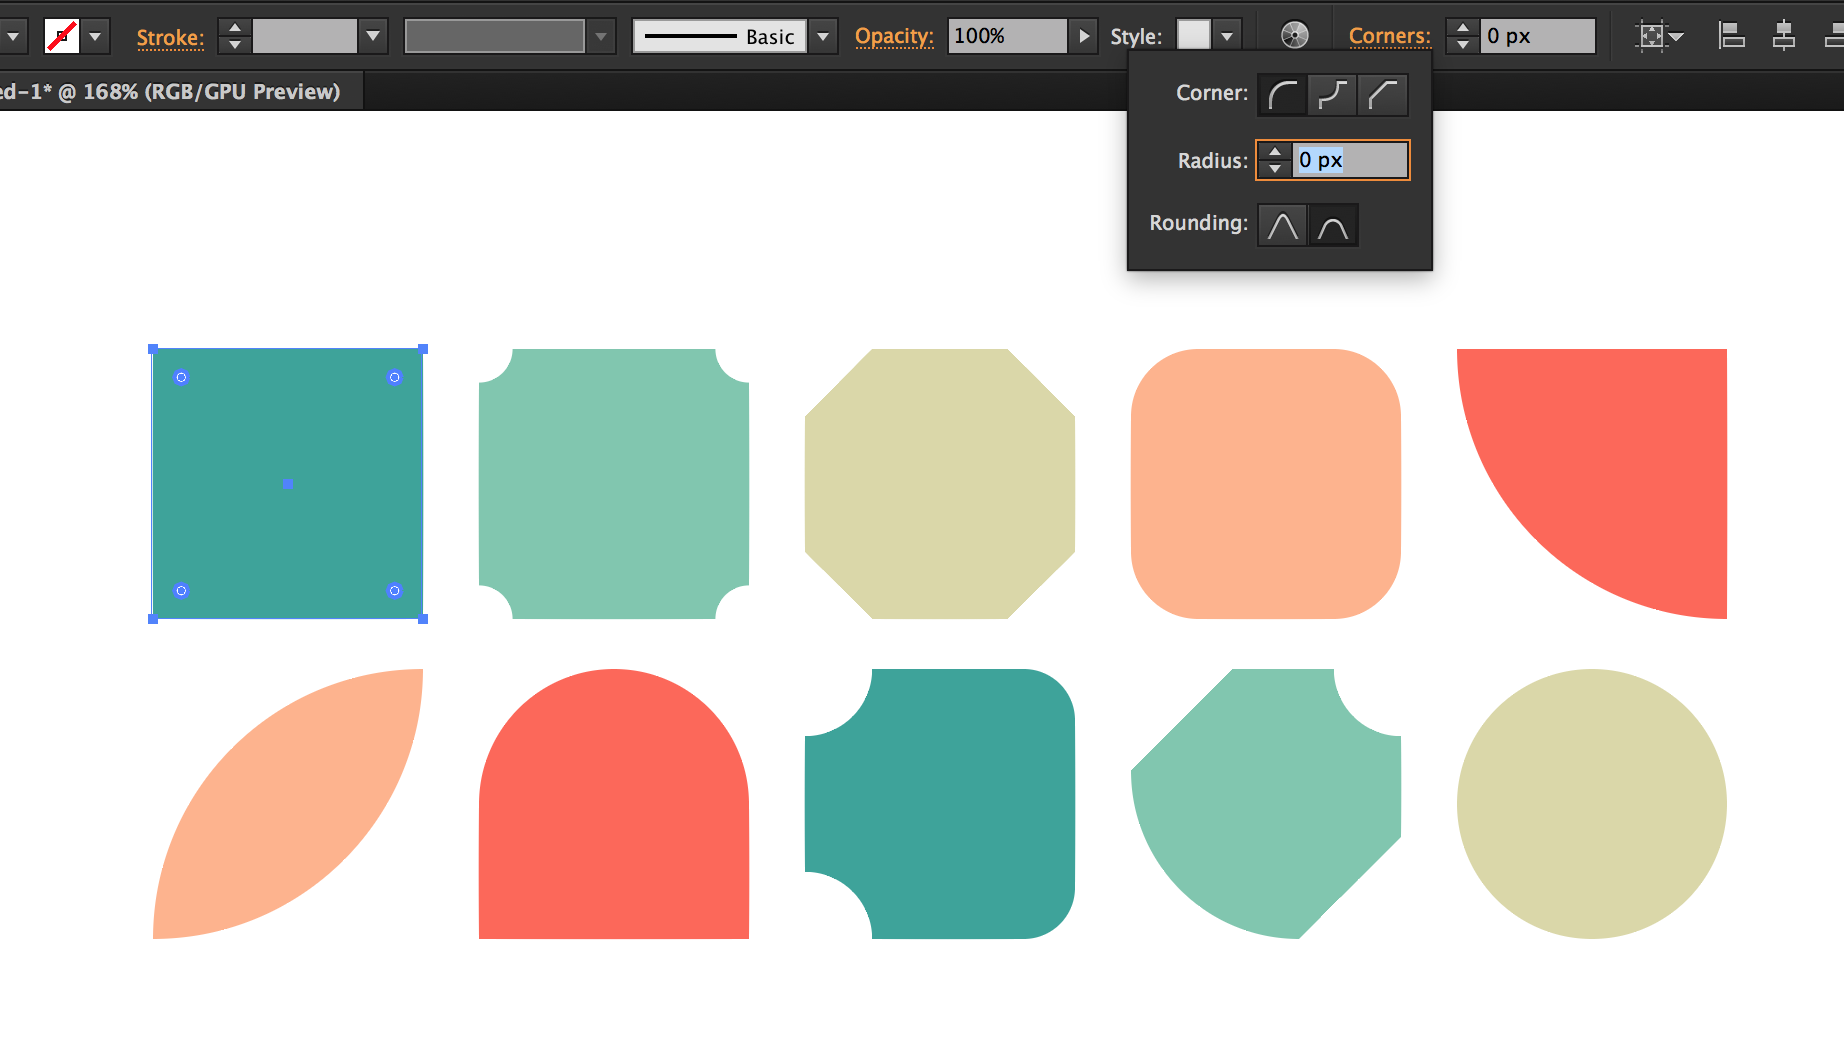
One of the best parts of the Live Corners tool is what you can do with a shape if you click the Corners hyperlink that is pointed out by the blue arrow in the image above. This brings up a dialog box with several options for what you can do with the corners. Remember to use the Direct Selection Tool (A) to select the individual corners. These examples were made by choosing individual corners and tweaking those corner points using the dialog box. Experiment to see what you can come up with!
The Live Corner effects also apply to the next two shapes that we will talk about, the Polygon and Star Tool. I want to keep these posts bite-sized and easy to get through, so look for my breakdown of those great tools those in part two!
In the mean time, I would really like to hear from you, especially if you are trying to learn Illustrator. Have these posts been helpful for you? What posts would you like to see from me in the future? It is my goal to create value for those who are trying to learn Illustrator, and offer my approach to how I use these tools, so however you think I can help you best, please let me know! Let me know in the comments, or feel free to email me directly at grantmfisher@gmail.com. Thanks for reading!


